
Choosing a Hole Saw For Metal is not just a matter of matching diameter to a hole. The right choice depends on the workpiece, cutting depth, drill speed, and how often the tool will be used. A thin stainless-steel panel behaves differently from a thick mild-steel plate. Tooth material and pitch matter, too. So does the arbor. A poor match can leave rough edges, overheat the teeth, or make a clean cut feel unexpectedly difficult.
Safety deserves equal attention. The U.S. Bureau of Labor Statistics reported a total recordable injury and illness rate of 2.8 cases per 100 full-time workers in manufacturing for 2023. That figure covers many kinds of work, not hole-saw cutting specifically. Still, it is a useful reminder that stable workholding, suitable eye protection, and controlled tool speed are not minor details. The correct saw cannot replace careful technique.
This guide covers seven practical selection points, from bi-metal and carbide-tipped teeth to diameter, cutting depth, pilot drills, and compatible arbors. It also explains why lubrication and steady pressure help when cutting metal. Small details count. A hole saw that looks sturdy in a product photo may not suit a deep cut or repeated use. I would check the manufacturer’s speed and material guidance before buying, then test the setup on scrap when possible. That step can feel fussy, but it often saves time and prevents avoidable damage.
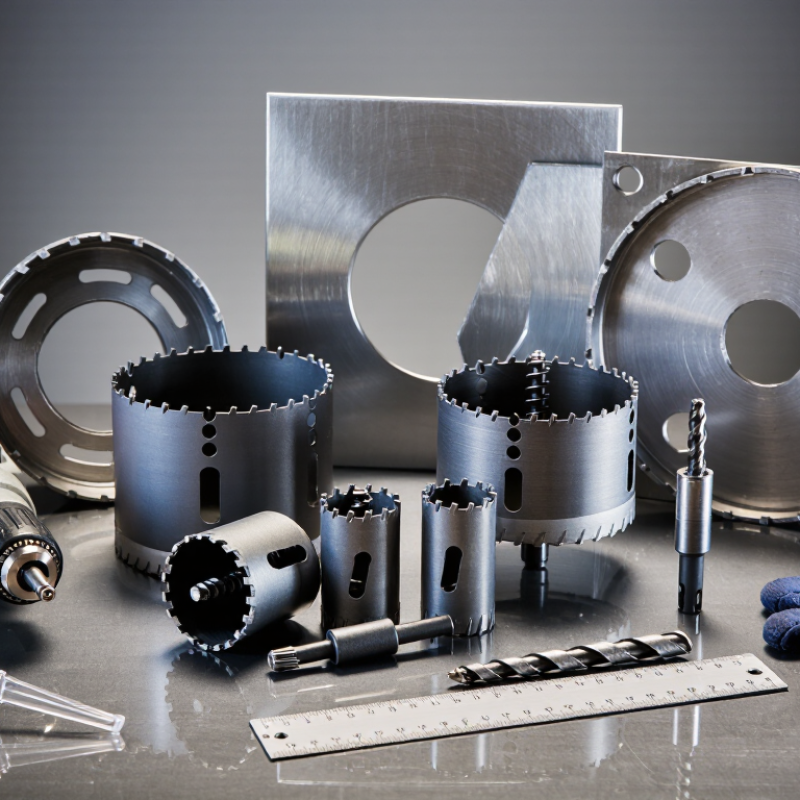
A hole saw cuts metal by removing a narrow ring, leaving a round plug in its center. Its toothed rim does the cutting; the pilot bit guides the tool and helps keep it from wandering. Unlike a twist drill, it does not turn the whole hole into chips. That matters. The teeth must stay sharp and clear of packed shavings.
For thin sheet metal, a bi-metal hole saw is often suitable. Harder or thicker stock may call for carbide-tipped teeth, but check the tool’s stated material limits. Secure the workpiece firmly, mark the center, and use a drill with controlled speed. Metal usually needs slower rotation than wood.
Apply steady, light pressure rather than forcing the saw. A suitable cutting fluid can reduce heat and wear. If the teeth squeal, smoke, or stop cutting cleanly, pause and check the speed, lubrication, and chip buildup.
As the cut nears completion, ease off the pressure. The center plug can bind or drop suddenly, and sharp edges remain around the opening. Wear eye protection and let the saw cool before handling it. In practice, getting a perfectly smooth cut is not always realistic; thin sheet can flex, and a slightly uneven start may leave a rough edge. Remove the plug only after the tool stops, then deburr the hole with an appropriate file.
Match the hole saw to the metal before choosing its diameter. ASM Handbook property tables show why: common austenitic stainless steel conducts heat at roughly 14–16 W/m·K, while aluminum alloys are often around 120–230 W/m·K. These are typical ranges, not guarantees; alloy and thickness matter. Stainless sheds heat slowly, so a sharp, heat-resistant cutter and steady feed help limit tooth wear. Aluminum cuts more readily, but chips can pack between teeth. Heat builds fast.
Diameter changes the workload. A large saw engages more material and demands more torque than a small one. Check the saw’s rated capacity and cutting depth against the workpiece, then use the speed guidance supplied for that tool. For thin sheet, finer teeth can help maintain a smoother cut; thick plate needs enough cutting depth and chip clearance. I still check the alloy specification when possible—“steel” alone is a vague description.
Tips: Match tooth material and pitch to the metal and thickness. Use a pilot bit to keep the cutter centered. For wide holes, clamp the work securely and clear chips often. If the cut squeals or turns blue, stop and reassess speed, feed, and lubrication; those clues are useful, though not a perfect diagnosis.
Tooth geometry should match both the metal and its thickness. Fine, closely spaced teeth help keep thin sheet from catching, while a coarser or variable pitch gives chips more room to escape from thicker plate. For stainless steel, a steady feed matters: rubbing instead of cutting can quickly heat the teeth. Keep the saw square, use cutting fluid where appropriate, and clear packed chips before they bind. Small details matter.
Material selection is just as important. A bi-metal saw with high-speed-steel teeth suits many routine cuts in mild and stainless steel; carbide-tipped teeth can last longer on abrasive or harder alloys, but tolerate side loading less well. The ISO 513:2012 cutting-tool classification groups workpiece materials into six application classes: P, M, K, N, S and H. That framework is a useful reminder that “metal” is not one cutting condition: steel, stainless steel, cast iron and heat-resistant alloys behave differently. Match the tooth and tool material to the actual workpiece, then follow the saw maker’s speed guidance. A perfect chart still cannot account for every machine, setup or worn tooth. Check the first cut for blue chips, chatter or a ragged edge, and adjust before continuing.
Before buying a hole saw, check that its shank and arbor fit your drill’s chuck. A large saw can demand more torque than a compact drill provides. Fit matters. Look for a drill with a side handle and a clutch or controlled trigger. Avoid impact mode unless the saw instructions specifically allow it. A sudden grab can twist the drill and your wrist.
Cutting depth must exceed the metal’s thickness, with room for the pilot bit and accumulated chips. For thick plate, a deep cup may still stall as chips pack inside. Pause, withdraw the saw, and clear the teeth. Slow down. Secure the workpiece firmly, and support thin sheet metal to reduce vibration and tearing. Keep the saw square as the pilot bit starts the hole.
Set speed according to the saw diameter, metal type, and the manufacturer’s guidance. Larger saws generally need slower rotation; forcing high speed can overheat teeth and discolor the work. Use steady pressure and suitable cutting fluid when recommended. If the drill bogs down, ease off rather than pushing harder. I have found that speed charts are easy to overlook, especially when changing saw sizes mid-job. That small check can prevent a rough cut and a worn-out saw.
Check drill compatibility, cutting depth, and speed. The chart shows example spindle speeds calculated for a constant cutting speed of 30 m/min; it is a reference, not a universal setting.
Use a drill with sufficient torque and a compatible arbor. Confirm the saw’s cutting depth suits the workpiece, secure the metal, use cutting fluid where appropriate, and follow the saw and drill manufacturers’ guidance. Actual speed depends on the metal, saw material, and cutting conditions.
Durability starts with matching the saw to the metal. For thin sheet steel, a bi-metal hole saw can offer a useful balance of toughness and cost. For tougher alloys or frequent use, carbide-tipped teeth may last longer, though they can chip if the tool catches. Check tooth condition, weld quality, and whether replacement pilot bits are available. A low purchase price is less appealing if the saw dulls after a few holes. Still, paying extra does not guarantee better results.
Safety features matter in daily use. Look for a secure arbor connection and a pilot bit that stays centered. Clamp the workpiece firmly; thin sheet can twist suddenly when the teeth break through. Wear eye protection, and keep hands clear of the cutting area. Use a drill speed suited to the saw and metal, with cutting fluid when appropriate. Stop if the saw overheats or binds. Small details matter. A smooth, controlled cut is safer and usually extends tooth life.
For overall value, compare the cost per expected hole, not just the price tag. Consider the sizes you actually need, arbor compatibility, and how easily the slug can be removed. A kit with many rarely used sizes may look like a bargain but take up space. I would not assume one saw suits every metal or thickness; that judgment can be inconvenient, but it prevents costly wear and rough edges.
| Tip | What to Compare | Best Fit | Durability and Value | Safety and Use Notes |
|---|---|---|---|---|
| 1. Match the cutting material to the job | Compare bi-metal teeth with carbide-tipped designs. Bi-metal saws use hardened cutting teeth bonded to a tougher backing; carbide tips retain hardness at higher temperatures. | Bi-metal suits many common steel and aluminum jobs. Carbide-tipped options can be useful for frequent cutting of harder or abrasive metals, when specified for that material. | A more specialized or expensive saw is worthwhile when its cutting material matches repeated work; for occasional cuts, a suitable bi-metal saw may offer better value. | Check the saw’s stated material compatibility rather than assuming every metal-cutting hole saw is suitable for stainless steel or hardened alloys. |
| 2. Choose the correct diameter and cutting depth | Confirm the required hole diameter and the saw’s usable cutting depth. The workpiece thickness must be within the saw’s capacity; deeper cuts may need access from both sides or a different tool. | Use the closest available size to the drawing or fitting specification, and verify the arbor can accept that diameter. | Buying only the sizes used regularly avoids paying for unused pieces. A set is better value when its included sizes match planned work. | Do not force an oversized saw onto an undersized arbor. Check that the workpiece is supported and secured before drilling. |
| 3. Check tooth design for metal thickness | Look for tooth geometry and spacing intended for metal. Fine, regular teeth generally provide more cutting points on thin sheet than widely spaced teeth designed for faster, coarser cutting. | For thin sheet, choose a metal-rated saw with a fine tooth pattern. For thicker stock, follow the tool maker’s guidance for tooth form and material thickness. | The right tooth pattern can reduce snagging and premature tooth wear, helping the saw produce more consistent cuts over its service life. | Thin sheet can catch or deform. Clamp it securely against a backing surface and use controlled pressure rather than forcing the cut. |
| 4. Evaluate the body and construction | Inspect the cup for a rigid, well-formed body, secure tooth attachment, and openings that allow chips and the cut-out slug to be removed. | A sturdy body is useful for repeated work and larger diameters, where cutting loads are higher than for small holes. | Compare construction and expected replacement needs, not just purchase price. Teeth that can be replaced may reduce long-term cost if replacement parts are available. | Stop if the cup is visibly bent, teeth are damaged, or the saw runs out of true. A damaged cutter can vibrate and produce an unsafe cut. |
| 5. Confirm arbor compatibility and security | Check the arbor’s thread or connection type, shank size, pilot drill arrangement, and stated hole-saw diameter range against the drill and saw. | Use an arbor designed for the hole-saw size and compatible with the drill chuck or machine spindle. | A compatible arbor can serve multiple saw sizes, making it a practical investment when the connection and capacity match the intended set. | Tighten the saw and arbor according to their instructions, remove the chuck key before starting, and disconnect power before changing accessories. |
| 6. Consider heat management and chip removal | Look for a design that allows chips to clear, and check whether the cutting instructions recommend cutting fluid for the workpiece material. | For many ferrous-metal cuts, suitable cutting fluid can reduce friction and heat. Follow the tool and fluid instructions, especially for stainless steel. | Managing heat and clearing chips can help preserve cutting edges and reduce time lost to stalled or poor-quality cuts. | Use the speed recommended for the saw diameter and material; larger hole saws generally require lower speed than smaller ones. Clear chips only after the tool has stopped. |
| 7. Compare total value and safe-work provisions | Compare the included arbor, pilot drill, case, available replacement parts, and instructions. Confirm the tool is rated for the drill or machine and material being used. | A kit is convenient for varied hole sizes; a single saw is often more economical when one diameter covers the task. | Estimate cost per expected use, including compatible accessories and replacement parts, rather than comparing initial price alone. | Wear eye protection and suitable work gloves for handling sharp edges, secure the workpiece, keep hands clear of the cutter, and follow the drill and hole-saw instructions. |
Note: Cutting capacity, speed limits, and material compatibility vary by hole-saw design. Follow the instructions supplied with the specific saw, arbor, and power tool.